Wow.. it is half way through summer already! crazy. I have been working on some fun art lessons, they will be posted very soon, I promise. Also, I have been working on some fun crochet blankets and necklaces, as well as, gardening, working out (ZUMBA IS THE BEST), and spending time working on my cooking skills (thanks to my wonderful husband, he is the best cook ever)!
Starting this friday the Mr. and I will be taking a road trip to Tennessee! We will be adventuring through Nashville, Tullahoma, Normandy, Chattanooga, and Gatlinburg. I can't wait! We will be visiting the First Center of Art Museum. http://www.fristcenter.org/site/default.aspx
I hope to get some ideas for new lesson plans, and of course, I will be sharing them will all of you, my dear blogger friends.
If you have been to these cities in TN, or live there, please send me any cool traveling places, art galleries, dining places, any thing you would like to share that would be absolutely helpful!
I hope you all are having a great summer break! I would love to hear what you all are up to.
Tuesday, July 12, 2011
Sunday, June 5, 2011
Printmaking:Modigiliani Self-Portraits
This is one of the best projects of the year, the students absolutely fell in love with the printmaking process.
What you will need:
printmaking styro foam plates (or styrofoam lunch trays, etc.)
speed ball printing ink( all different colors)
pencils
scrap paper
all different colors of construction paper cut to the size of the plate ( a little bigger then the plate)
Info on artist Amedeo Modigilani ( I made a slideshow)
First we looked at some examples of Amedeo Modigiliani's work. Then we drew a step by step self portrait on a small scrap paper. THEY LOVED DRAWING THEMSELVES IN ABSTRACT FORM, WITH LON NECKS, LONG HEAD, ETC. We taped the scrap paper to the styrofoam plate and then outline the scrap paper by pressing hard on to the styrofoam.
For printing: I made sure they pressed hard into the styrofoam with their pencils, so it would make a good print. I had them come in groups pick 3 colors of different paper and 1 color of ink. They created 3 so they could choose the best.. and then we made ghost prints at the end to see if the "faded" look turned out.


 Then they made a frame for their Modiligani self-portraits and glued their favorite print in the middle of the frame.
What you will need:
printmaking styro foam plates (or styrofoam lunch trays, etc.)
speed ball printing ink( all different colors)
pencils
scrap paper
all different colors of construction paper cut to the size of the plate ( a little bigger then the plate)
Info on artist Amedeo Modigilani ( I made a slideshow)
First we looked at some examples of Amedeo Modigiliani's work. Then we drew a step by step self portrait on a small scrap paper. THEY LOVED DRAWING THEMSELVES IN ABSTRACT FORM, WITH LON NECKS, LONG HEAD, ETC. We taped the scrap paper to the styrofoam plate and then outline the scrap paper by pressing hard on to the styrofoam.
For printing: I made sure they pressed hard into the styrofoam with their pencils, so it would make a good print. I had them come in groups pick 3 colors of different paper and 1 color of ink. They created 3 so they could choose the best.. and then we made ghost prints at the end to see if the "faded" look turned out.


Tuesday, May 10, 2011
It has been awhile...
Wow.. I really need to post like 7 new lessons, but I have been very busy trying to get the art show completed. Tomorrow during Art club time (early A.M.) I am going to show the art clubbers how to set up all the 3-D projects and how to properly mount artwork. They LOVE helping.. and I really need some extra hands..
ALL the 2-D projects are in the hallway already, all the projects look fabulous!
I am going to try to post everything tomorrow and friday.
Thanks for checking out my blog and come again when there are some new lessons!
:)
ALL the 2-D projects are in the hallway already, all the projects look fabulous!
I am going to try to post everything tomorrow and friday.
Thanks for checking out my blog and come again when there are some new lessons!
:)
Tuesday, April 26, 2011
1st Grade "If the Dinosaurs came Back" Dinosaur Drawings
DID YOU EVER READ THIS STORY??? It's a must.. and I love the simple Illustrations.

This book is absolutely wonderful! The author puts the Dino's in really cute and clever atmospheres! So the lesson was to draw a dinosaur (I handed out a handout that I found with all different dinosaurs on it)
The students were to try their best to create a "realistic" dinosaur and put it in an unrealistic setting.
They drew the dinos, background and outlined in Sharpie markers, and colored in with Markers and Crayons.


THE VERSATILE BLOGGER AWARD

Thank you so much to Lauren from Dalismoustache.blogspot.com for the versatile Blogger award! She has great lessons, I have used a couple of her ideas in my classroom, so I feel really honored.
For this blogger award we are asked to share 7 interesting facts about ourselves and select 10 other bloggers for this award.
1. This year I got married to my best friend, Brian. (he loves Mopeds) We got married on November 20, 2010. Here are a couple pictures of the day. Oh and I love mustaches and beards just as much as Lauren does so we made felt ones to give away as favors. All the flowers are made out of paper. And our cake toppers were gnomes.


2. I love gnomes. I think they are full of antiquity, history and charm. I have over 15 lawn gnomes, I have collected from auctions, yard sales, and gifts from friends/family.
3. This is my first year teaching, L.T.S. I absolutely LOVE it. I have been looking all over the counties in PA. and no one is hiring. It makes me nervous but I know their is a plan for me. I just don't want to do anything but teach art. It makes me sad to know that I might not be doing what I love next year, but there might be another door to open with other opportunities behind it.
4. My dear friend, Katie and I are running a marathon this November in Philadelphia, Pa. Major training starting in the beginning of June. 26.2 miles to go. I will shed some tears when I cross that finish line
5. We own a pet chinchilla named Moses. He is our baby. Well now Brian and him are best friends, since I moved in after we got married.
6. We live really simply, in the heart of the Lancaster city. Cities can be really unkind sometimes but there is great opportunity for community, and I must say our community is great. We are saving for a house but we aren't really sure where to look since we don't know where I will be working.
7.I love pickles/olives, I can eat a jar of them in a heart beat. Ever since I was like 10, I can't stop myself around pickles. :)
So those might not be that interesting.. but you know.
Pass the Award on to 10 recently discovered bloggers:
Congratulation to you and thanks for all of the inspiration! Pass it on...
(now: tell 7 interesting facts about yourself, pass the award onto 10 of your newly discovered or favorite bloggers, and lastly, thank and link back to the blogger who gave you the award.)
Tuesday, April 19, 2011
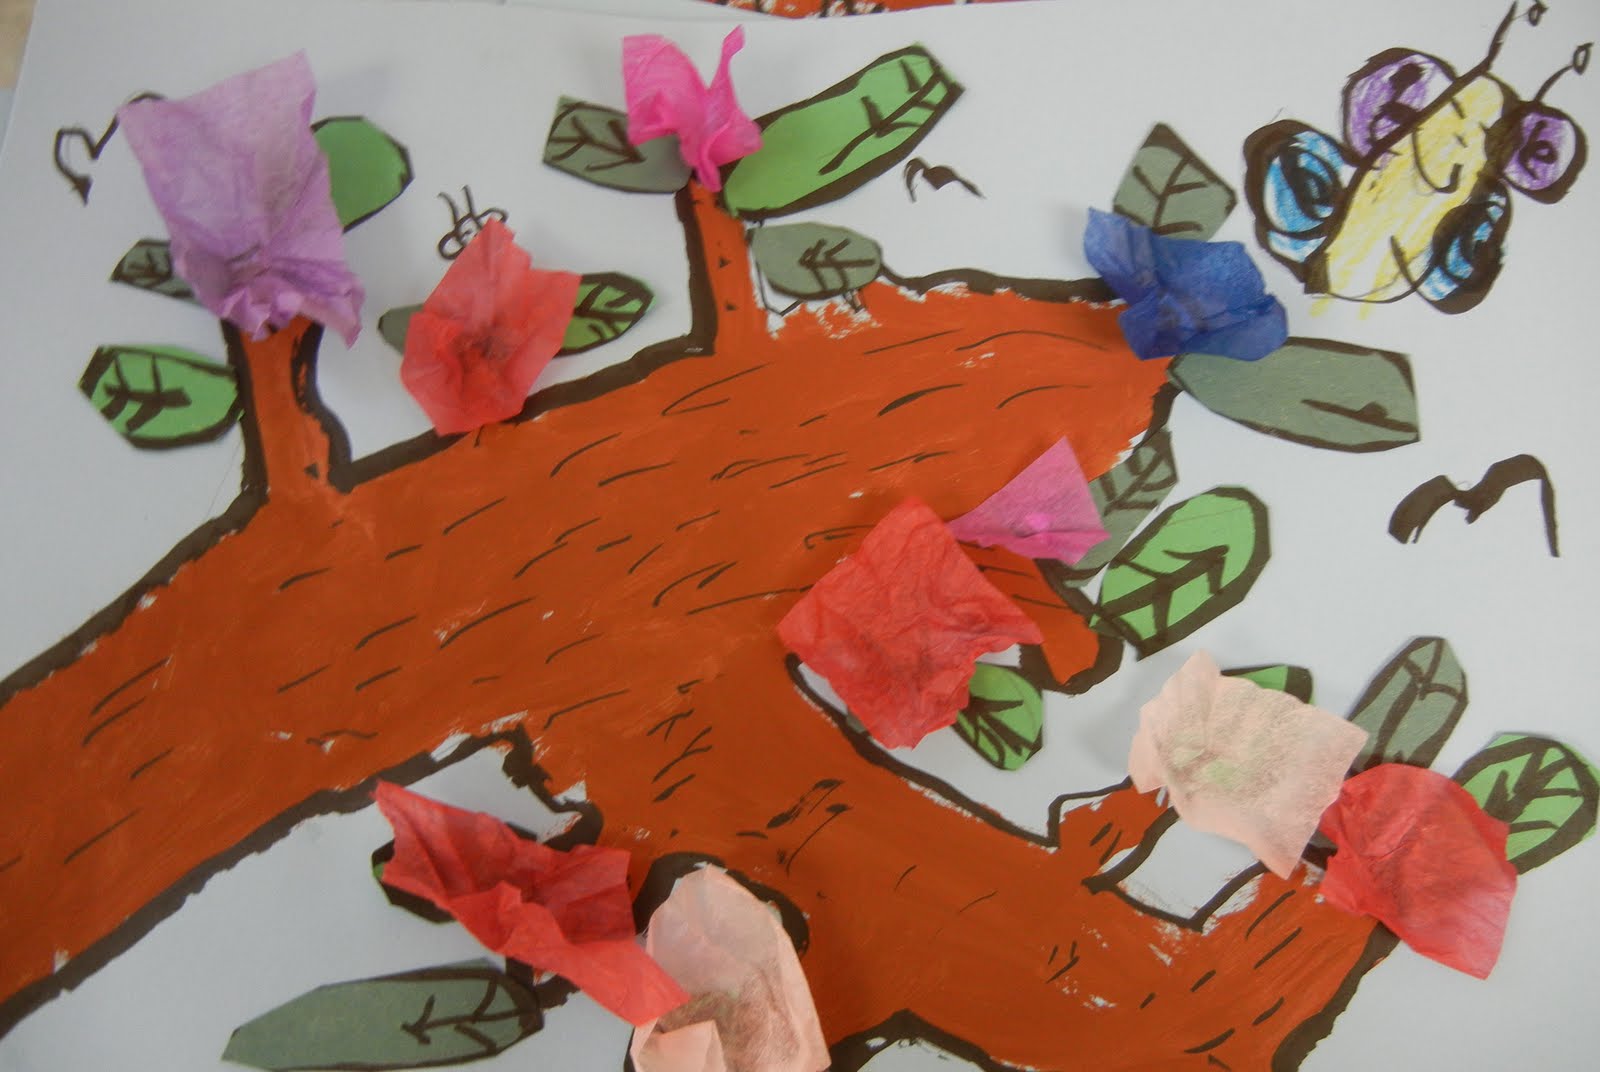
2nd Grade Apple Blossom Branches
These were so fun to create. and they are a little different from different apple/cherry blossom lessons I've seen.
We used 11" x 17" light blue construction paper. acrylic paint (brown), thick Sharpie markers, assorted tissue paper, glue, yellow paint.
We talked about symmetry vs. asymmetry; then created a asymmetrical branch. Painted it with brown acrylic paint, allowed to dry, outlined with black sharpie marker, added dashes for texture of the branch.
Then we used a pencil to create flowers and glued down on the little branches/twigs.
Then students had free choice to add butterflies, squirrels, flies, etc. to the background.
They turned out great.. During the Art Show the parents and community really enjoyed the branches.


Wednesday, April 13, 2011
4th Grade "American Gothic" Inspired Pairs
These are fantastic! WOW.. the students gobbled up this project. It did take about 3 weeks, Especially because we had PSSA's this month. March seemed to drag by but this project helped out.
First start off with a 11" x 17" white construction paper. We used rulers (math) to frame out an 1" border. We discussed Grant Wood, where he is from, what he created, and his painting "American Gothic".
We then discussed facial and body proportion. They were to draw themselves and someone they know and admire. They could draw an animal instead of a person, if an animal was their best friend. They needed to add a background that was significant to them.
Here are some wonderful examples:

At a football game

In their backyard

At the aquarium

Hanging near the hammock with friends

"Dreaming of cheese"

Inside with his birds and mom

At the beach

Bringing his fish outside for some sunlight

Spending time with her Gerbal

Movie Time!

Out taking a walk with her cat.
Subscribe to:
Posts (Atom)