Search This Blog

Tuesday, March 22, 2011

LOOK AT ALL THESE TREASURES!


NO that is not my huge recycling pile, It's future recyclable monsters! Our Art club will be starting these tomorrow. AND some of our 4th grade classes will be making either animals/monsters.

The school staff and some of the Art Club parents have donated their plastic, paper, etc. recyclable products.

I CANT NOT WAIT to see what the outcomes are for these clean plastic bottles.
I made a monster but I think I will keep you all in suspense and put them in with the student work and see if you can pick it out. All my students, including my ART CLUB students don't get enough chance to work with 3-Dimensional because we don't have a kiln for clay. So I thought we could do a eco-friendly project, as well as, 3-Dimensional one.


Kindergarten Fish Bowls

We read "I'm the best artist in the Ocean" by Kevin Sherry ( I believe). We started out with a tracer of a fish bowl.
We then drew the main character of the Story, a Squid with a mustache. Then added all different types of crabs and fish, etc. We traced all pencil lines with black Sharpie marker. Then color all fish/objects with crayons. Go over the water with blue tempura water cakes.
Allow to dry. Then we cut them out and looked at them all together, a mini-class critique.

This was a 1-2 day project. The class really enjoyed the story and the slideshow, I showed, off fish and underwater images.

Take a look! They look like a fishbowl that I always dreamed of!


KIndergarten Spring Flower Collage

I haven't posted many of our kindergarten projects, so for  the next couple of weeks I'm going to try to update as many as I can.

This project was great to do with my full day Kinders! We reviewed how to draw circles, cut out different shapes, rip the petals, and use different materials (cotton balls, metallic paper, tissue paper, etc)

We started out with 9" x 12" light blue paper.  I had previously cut stems for the flowers. THey used a glue stick and glue 3 stems on their paper, making sure to have the stem end at edge of paper.

Then we used a long green strip for the grass. I demonstrated how to use the scissors to cut little cuts all the way down the strip to create grass that "pops" off the page.

We then ripped our petals from scrap paper we have on a scrap cart in class.

We added square metallic paper to the middle. We discussed different shapes.

We then used cotton balls for the clouds in the sky. They loved this part.

This project is great for fine motor skills, student free choice, and introducing/reviewing collage/multi-media projects.
 This could be easily adaptable to higher grades.


I am so excited to see our full day kinders become little Multi-Media Artists!

3rd grade Jim Dine Warm/Cool Compass Designs

As you can see I did a unit about Jim Dine with my 1st, 2nd, and 3rd graders. I love Jim and all the different lessons you can create using his subject and love for color.

This was a challenging project. I have seen some projects like this, art projects for kids, think create art, and oodles of art; the one with the hand in warm colors and the background in cool. They are very eye-catching. The lady that I am subbing for (the last link) does a warm/cool hand project. I wanted the students to have the warm/cool review with a twist of compass and art history/criticism.

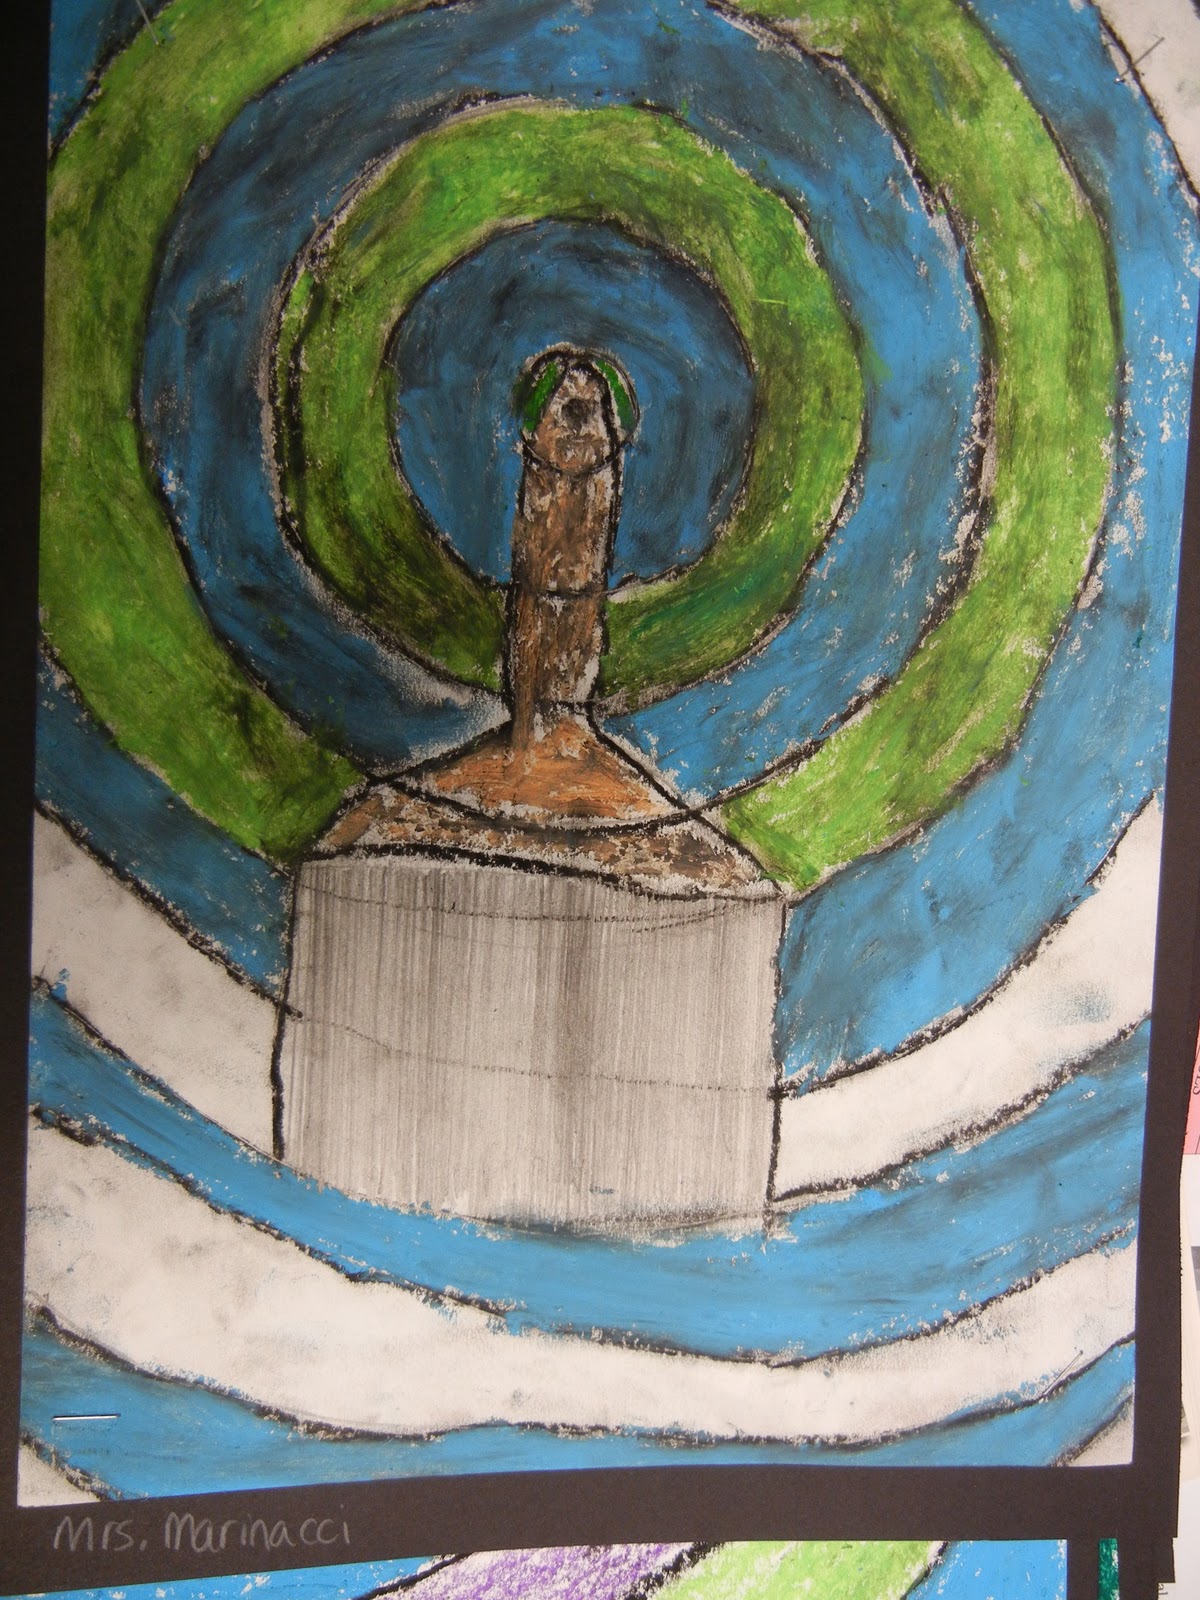
I wanted to have my third graders introduced into using compasses to create circles.

1. We started off with a teacher made slideshow of a brief bio of Jim Dine and LOTS! of images.
2. The students received a 9" x 12" piece of white construction paper.
3. They were asked to either draw, with black or brown oil pastel,  an outline of a heart or a tool, based off of Jim Dine. Hand outs of tool shapes were provided.
4. After teacher demo, the students added a dot anywhere inside of there subject.
5. started out with the smallest circle and continued to make each circle 1" bigger, until they couldn't go any further.
6. To complete the circles until the edge of the paper, they "eyed" 1-2 circles. I thought this would be helpful because they could try to see if they could make a circle one inch away for the other line.
7. They outlined every pencil line with black or brown oil pastel.
8. Added cool colors in back ground and warm colors, with oil pastels, in subject.

This was challenging, a lot of steps, but at the end they felt so accomplished. The compass was a little tricky at first because their is only one of me and 20 some of them. I had some helpers in class, help their neighbors if they finished early. Most of my students love helping and the students that need help, love to interact with their fellow classmates.

Check them out for yourselves!! Some made mistakes as to where the warm and cool colors go, but as long as they see they made the mistake and learn from it, I think it adds to the overall composition.


Paintbrush (not completed)


Saw 


Paintbrush


Tuesday, March 8, 2011

1st Grade Under the Sea Portholes

1st Grade Under the Sea Portholes 

WOW.. I love this project.
I got the idea from a 1970 craft pamphlet, twisted it to incorporate under the sea, instead of above the sea.

We start out with 11" x 17" White Construction paper.
We cap off the corners and then draw a large oval in the center of the page.
We draw mini-circles with x's in them to create screw's to "attach" the porthole frame to the submarine.
Then we add a horizon line.. to divide sea and sand.
We practice our sea creatures together on the back of the paper, and when they feel confident they turn the paper over and add a good amount of sea creatures.
We outline in Black Sharpie Marker.
Color the sea creatures, porthole frame, coral, etc. with crayons.
Then we do a type of crayon resist painting. By using tempura watercolor cakes to paint the sea and sand.
We talked about warm/cool colors.

THEY LOOK SUPERB. They are so creative and wonderful!!!