Search This Blog

Showing posts with label painting. Show all posts

Friday, December 11, 2015

3rd Grade Wayne Thiebaud cakes

Hello Everyone!!!
My 3rd grade students created 3 tier cakes based off of well-known pastry/cake painter (on canvas) Wayne Thiebaud. I found a great video ( showed like 3 ish minutes about the artist) on youtube:
The students loved seeing the compare/contrast of real cakes/pies to his paintings and the way that Thiebaud talks about the paint being like 'icing'.
So 1st day we drew the 3 tiers and then added a slice out (choice for students). They outlined and erased any sloppy lines.

2nd day they painted the "details" with water color. And the rest of the cake with DIY PUFFY PAINT. DIY PUFFY PAINT is the best. I made puffy paint using same parts glue, tempura paint and shaving cream. My students LOVED using this paint. It felt like icing (didn't smell like it, which is a good thing because i think i would have had students licking the paint otherwise, hahahahaha.. it was that convincing looking)

here are some results (some classes needed 3 full classes just depending on class size and speed)


I had a couple of hand outs with how to draw a step-by-step 3 tier cake and how to 'cut' a slice of cake out.

If you look closely you can see the 'icing' texture on the cakes.

Have a great day! Thanks for stopping by!


Sunday, January 22, 2012

4th grade Tissue Paper Painting Peacock Portraits

We did this project before the Holiday season, it's a little late in posting this project HOWEVER this project turned out great.

We started with a background of peacocks, and then drew a basic portrait of a peacock.

We outlined with medium black sharpies and then colored in the peacocks body and the "eyes" of the feather with realistic oil pastel colors.

To add the vibrant colors of the feathers we painted with tissue paper. I cut up 1" to 2" squares of tissue paper of blues/greens/purples/browns etc.
We painted on plain water and then add tissue papers and THEN painted over with clear what to add a watercolor effect.

Check them out!!!


If you try this in your classroom, please let me know... you will love the results and your students will too and they will feel successful, well at least I hope!

Tuesday, March 8, 2011

1st Grade Under the Sea Portholes

1st Grade Under the Sea Portholes 

WOW.. I love this project.
I got the idea from a 1970 craft pamphlet, twisted it to incorporate under the sea, instead of above the sea.

We start out with 11" x 17" White Construction paper.
We cap off the corners and then draw a large oval in the center of the page.
We draw mini-circles with x's in them to create screw's to "attach" the porthole frame to the submarine.
Then we add a horizon line.. to divide sea and sand.
We practice our sea creatures together on the back of the paper, and when they feel confident they turn the paper over and add a good amount of sea creatures.
We outline in Black Sharpie Marker.
Color the sea creatures, porthole frame, coral, etc. with crayons.
Then we do a type of crayon resist painting. By using tempura watercolor cakes to paint the sea and sand.
We talked about warm/cool colors.

THEY LOOK SUPERB. They are so creative and wonderful!!!


Wednesday, February 2, 2011

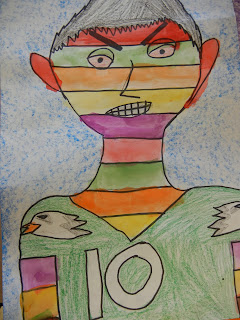
2nd Grade "Bad Case of the Stripes" Self-Portraits

This book, "The Bad Case of Stripes" by David Shannon is absolutely wonderful! When I searched online to see if there were any videos, I stumbled along a website called www.storylineonline.net.
This website has a variety of stories that are read by celebrity people.
 At our school teachers use this website all the time to help introduce books, use technology, and show creativity in there lessons. Many 2nd grade teachers already introduced this story to their class, so it turned out to be a great cross curriculum lesson.

I got the idea to use this story from some 2nd grade teachers in my building  and also saw some good self portrait ideas from this site self-portraits, and I saw another great lesson that mrs.jahnig did with her 2nd grade classes that was based on "A Bad Case of Stripes."
For this project we used a 11" x 17" white construction paper. We drew our self portraits by adding shapes upon shapes. They drew everything with pencil and outlined with medium Sharpie Marker. They used rulers to measure the stripes, approx. 1" apart from each line. This was a really great way to teach them how to use the ruler, make straight lines, and intergrate math in a simple and fun way. We used crayons to apply color to the hair, eyes, and t-shirt. Some added crayon color to their background. Once finished with crayons, students added color to their stripes and background with tempura cakes (like water color but darker/richer colors).
They turned out great!